Getting Started with Basic Linux Commands

Linux is an operating system, just like Windows and Mac OS. It’s a special kind of operating system because it is not owned by one person.
Anyone can make a Linux distribution and contribute to it. Yes! Linux is open-source and this makes it really fun.
Understanding how the Linux operating system works is vital and this article would get you started.
Ready? Let’s delve right in by understanding some common Linux commands and how they come into play in the terminal.
Basic Linux Commands
pwd: Present Working Directory.cp: Copy.mv: Move.whoami: Tells you your current logged-in user.mkdir: Creates a new directory.echo: Prints out your message(s).sudo: Short for ‘Super User Do’cd: Change Directory.ls: Lists the content of a directory.cat: The cat command is used for a lot of things but in this context, it’ll be used to display the contents of a file.touch: This command is used to create an empty file.
Note: Linux commands are case-sensitive. E.g. cd is not the same as Cd
How to Add a New User on Linux
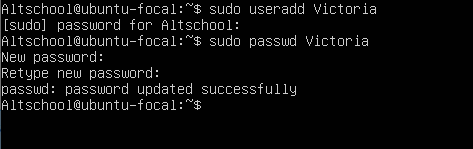
For this example, we’ll be creating a new user called “Altschool”

The command sudo useradd -m -s /usr/bin/bash Altschool creates a new user account named “Altschool” on the system.
The -m option creates the user’s home directory and sets up default files within it.
The -s /usr/bin/bash part specifies that the user’s default shell (command-line interface) should be the popular Bash shell.
The ~$ symbol indicates that the command is being run from the current user’s home directory.
The next step after creating your user is to create a password for the user.
Use the sudo passwd Altschool command.
You’ll be prompted twice to input a password and confirm.

Now we want the Altschool user to have admin privileges ie. become a “sudoer” so they can be able to make directories, edit configuration settings, create other users and groups, etc.
For that, we use the sudo visudo command.

The sudo visudo command opens the sudoers file where we can assign sudo privileges.
/home/altschool indicates the current working directory we’re in.
We’ll be using the nano text editor
Use the arrow keys to move the cursor to the line that starts with “root” under the “User privilege specification” section.
Move the cursor to the end of the “root” line and press Enter to create a new line below it.
On the new line, type Altschool ALL=(ALL:ALL) ALL
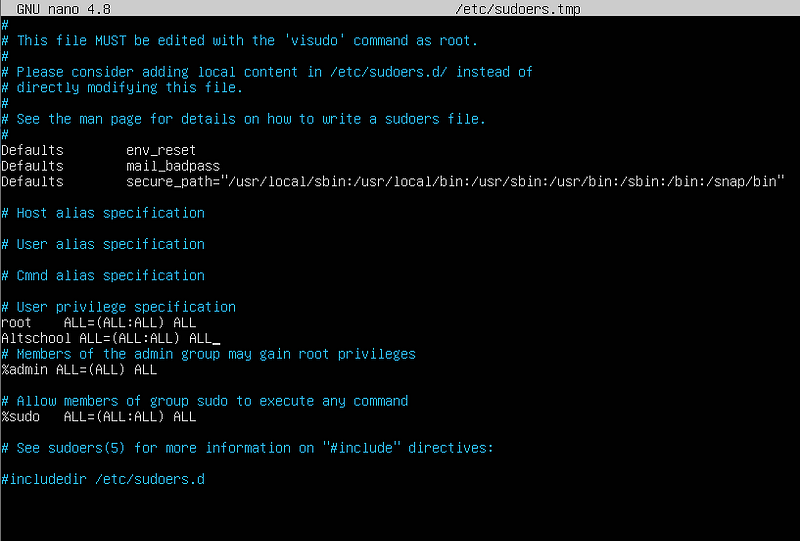
Press Ctrl+X to exit nano.
Press Y and then Enter to save the changes. nano will then ask for the file name to write to.
Press Enter to confirm the original file name (sudoers in this case)
Log into your newly created user, using the command below:
su Altschool
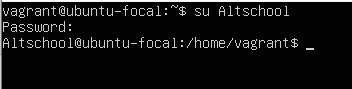
After logging in, you’ll notice how vagrant@ubuntu-focal changed to Altschool@ubuntu-focal.
Just to confirm you are logged in as Altschool, you can use the pwd command.
Enforcing New User Password Change on First Login
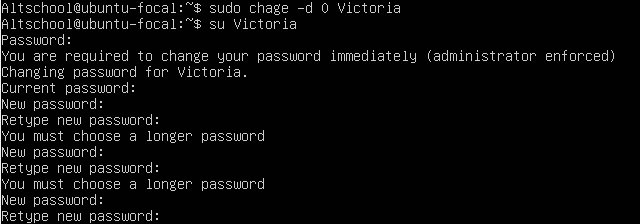
To create a user and force them to change their password upon login, follow these steps:
- Create the user: Use the
sudocommand to create a new user, along with a temporary password.
sudo useradd victoria
sudo passwd victoria
- Force password change: Use the
chagecommand to set the password expiry information for the new user.
The -d 0 option sets the “last password change” date to 0 days, effectively expiring the password immediately and forcing the user to change it upon next login.
sudo chage -d 0 victoria
How to Lock a User’s Password
Locking a user’s password prevents them from logging in until the password is unlocked.
This can be useful for security or administrative purposes.
- Lock the password: Use the
passwdcommand with the-loption to lock the user’s password.
sudo passwd -l Victoria
This command will lock the password for the user Victoria.
- Verify the lock: Run the command
sudo cat /etc/shadow | grep Victoriato verify that the password has been locked.
Expected Output:
The output should show an exclamation mark (!) before the series of letters, numbers, and alphanumeric characters, indicating that the password is locked.

Note: The grep command is used to search for a specific string (in this case, the username “Victoria”) in a file or output. It’s a powerful command for searching and filtering text.
How to Create a User With No Login Shell
Creating a user with no login shell prevents them from logging in to a system.
To create such a user, use this command:
sudo useradd -m -s /usr/sbin/nologin Braimoh

Verify the user information: Run the command getent passwd Braimoh to verify the user’s information.
getent passwd Braimoh
This command displays the user’s information, including their username, password, UID, GID, and shell.
Display the user information: Use the cat command to display the user’s information in a readable format.
cat /etc/passwd | grep Braimoh

How to Create Directories on Linux
Directories are to Linux distros what folders are to Windows.
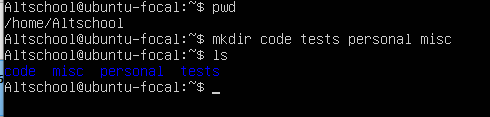
In the Altschool@ubuntu-focal home directory, we’re going to create four sub-directories.
To create the four sub- directories ‘code’, ‘tests’, ‘personal’, and ‘misc’ simultaneously, use the mkdir command followed by the directory names separated by spaces
mkdir code test personal misc
To confirm they’ve been created, we list them using the ls command
Absolute Pathnames and Relative Pathnames
An absolute pathname is the full address of a file or directory, starting from the root of your file system. It shows the exact location, no matter where you are in your file system.
Examples:
/Users/joy/Desktop/file.txt (Mac)
C:\Users\joy\Desktop\file.txt (Windows)
/home/joy/Desktop/file.txt (Linux)
A relative pathname is a way to specify the location of a file or directory in relation to your current working directory.
It’s a shortcut to navigate through directories without typing the full absolute path.
Examples of relative pathnames:
cd ./tests (move into the “tests” directory within the current directory)
cd ../images (move into the “images” directory one level up from the current directory)
../docs/readme.md (access the “readme.md” file in the “docs” directory one level up)
Task 1: Change to the tests directory using the absolute pathname
Changing to the tests directory means leaving your current working directory (home) to enter into the tests directory.
Using the absolute pathname, run the command below
cd /home/Altschool/tests

Task 2: Change directory to the tests directory using relative pathname
Since you’re already in the tests directory, first move up one level using the command cd ...
Then, navigate back into the tests directory using the relative pathname cd ./tests.
This shortcut saves you from typing out the full directory location.

Using the Echo Command
The echo command is used to output text to the terminal or redirect it to a file.
Its primary purpose is to print messages, display text, or create files with specified content.
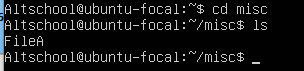
Task 3: Use the echo command to create a file named fileA with the text content ‘Hello A’ in the misc directory.

The command echo 'Hello A' > /home/Altschool/misc/FileA creates a file named FileA in the misc directory, containing the text ‘Hello A’.
The > symbol redirects the output of the echo command to FileA, overwriting any existing content.
To view the file’s contents, navigate to the misc directory and list the files using the ls command.”
Subscribe to the Web Security Lab Newsletter
Be the first to access exclusive content.
Using the cat Command
To see the content of fileA, move a step back and use the cat command to display its content. Specify the full path of the file.

Using the Touch Command
The touch command is used to create a new empty file or update the timestamp of an existing file.
Task 4: Create an empty file named fileB in the misc directory. Populate the file with dummy content afterward.
Run the command touch ./misc/fileB to create an empty file named fileB in the misc directory.

Now let’s add some dummy text to it.

Display the content.

How to Copy Files on Linux
Copying on Linux requires the use of the cp command.
Task 5: Copy contents of fileA into fileC
The cp command can be used to copy contents between files. If fileC does not exist, it will be created automatically.
When copying, the source file or directory comes first, followed by the destination file or directory, as shown below:

Display the content of fileC!

How to Move Files on Linux
We use the mv command to move files on Linux.
Task 6: Let’s move the contents of fileB into fileD
When moving contents from one file to another, the original file is automatically deleted, and its contents are transferred to the new file.
To verify this, use the cat command to view the contents of fileD, and you will see that it now contains the exact same data that was previously in fileB.


Additionally, you can also move files to other directories using the mv command.
For example, to move fileD to a directory named documents, you can use the following command:
mv .misc/fileD ~/Documents
This will move fileD from its current location to the Documents directory.
Note that the ~/ symbol represents your home directory, so the file will be moved to the Documents directory within your home directory.
Creating Archives on Linux
Archiving files and directories is an essential task in Linux.
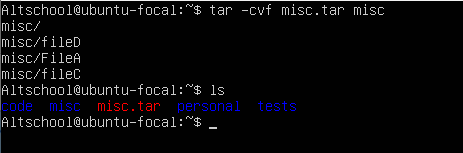
You can create an archive of a directory using the tar command, which stands for “tape archive”.
This command allows you to bundle multiple files and directories into a single file, making it easier to store or transfer them.
Task 7: Create a tar archive called misc.tar for the contents of the misc directory.
tar -c -f misc.tar misc
Compressing Archives
Once you’ve created a tar archive, you can compress it to reduce its size and make it easier to transfer or store. Compression is especially useful for large files or directories.
Task 8: Compress the misc.tar archive to create a misc.tar.gz file.
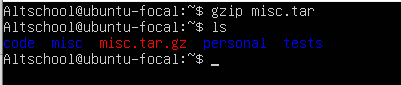
To compress a tar archive, you can use the gzip command.
The gzip command reduces the size of the file by compressing its contents. When you compress a tar archive, the resulting file will have a .tar.gz extension.
This command will compress the misc.tar archive and create a new file called misc.tar.gz.
The original misc.tar file will be replaced with the compressed misc.tar.gz file.
How to Disable Password-based Authentication For SSH
SSH stands for Secure Shell and it is a secure protocol used for remote access to a computer or server.
It allows users to securely access and manage a remote system, as well as transfer files between systems, using a secure and encrypted connection.
To learn more about SSH, read our Beginner’s Guide to SSH Connections.
Disabling Password-Based SSH authentication for PKI and other authentication methods protects your system from password attacks like brute-forcing and password-spraying.
Open the SSH configuration file using Vim by running the command:
sudo vi /etc/ssh/sshd_config

Use the arrow keys to scroll down to Password Authentication and use the insert key ‘i’ to type ‘no’. Done! Press the escape key and then ‘:wq!’ to save and return.

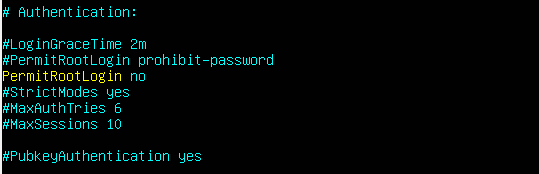
How to Disable Root Login For SSH
Disabling root login for SSH enhances security by preventing direct access to the root account via SSH.
To do this, repeat the same process as stated above.
Scroll down to PermitRootLogin and type “no”
I hope this Linux command guide was helpful.
And no, you don’t need to cram these commands.
As a beginner, understanding Linux requires constant practice and repetition.
Try new commands, research, and practice, and soon you’ll be able to navigate, manage, and optimize Linux systems with ease.
I’ll see you in the next!
Follow Victoria on X and check out her Medium blog where she writes about Cloud systems, Linux, and more!